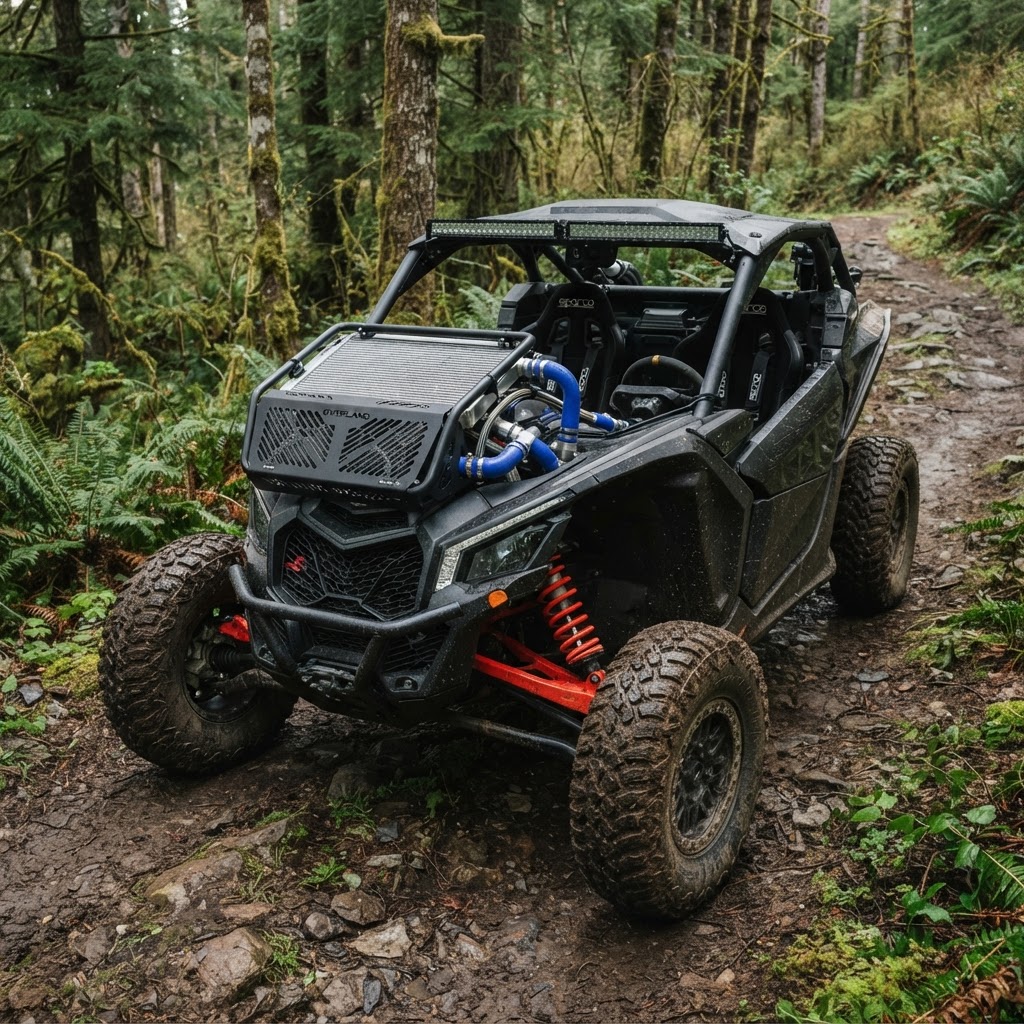
Discover how a UTV radiator relocation kit stops mud-clogged overheating, improves airflow, and shields your cooling system on extreme trails.
A utv radiator relocation kit moves your side-by-side's stock radiator from the lower front chassis up to the front hood or rear roll cage. By positioning the heat exchanger above the splash zone, you eliminate mud clogs, protect vulnerable aluminum cooling fins from trail brush, and ensure consistent airflow during deep-water and mud riding. If your machine repeatedly enters limp mode or overheats during bog crossings, relocating the radiator solves the root problem rather than just treating symptoms.
In our shop, we see riders spend hundreds of dollars replacing boiled-over coolant, toasted water pump seals, and blown head gaskets simply because their factory radiator is packed with dried clay. This comprehensive technical guide walks you through how relocation kits work, the key pros and cons, installation realities, and how to select the best setup for your machine.
Why Stock UTV Radiators Suffer on Tough Trails
Original Equipment Manufacturers (OEMs) design stock UTV cooling systems for broad recreational utility. Consequently, engineers position the radiator low in the front nose cone behind the bumper. While this provides clean aerodynamics and decent airflow on open gravel roads, it creates a massive collection trap when tackling rugged off-road environments.
The Mud-Cake Phenomenon
When you plunge into muddy water crossings, watery silt forces its way through the front grille and settles directly into the radiator cooling fins. As your engine heats up, that liquid silt bakes into an impenetrable, concrete-like crust. Even a 30% reduction in surface airflow causes coolant temperatures to spike beyond 220°F (104°C), triggering the ECU's thermal limp mode.
Mechanical Impact and Trail Debris
Lower front mounting places the delicate aluminum radiator core in the line of fire for:
- Dislodged trail rocks thrown by machines you follow
- Snapped sticks and branches spearing through the factory plastic grille
- Impact damage caused by rock crawling or nose-first ditch transitions
- Seed heads, marsh grass, and swamp weeds forming felt-like insulating mats
Cleaning these low-mounted units on the trail is virtually impossible. A garden hose rarely penetrates deep enough, and high-pressure washers will instantly fold the delicate cooling fins flat, destroying heat dissipation completely.
What Is a UTV Radiator Relocation Kit?
A relocation package is a dedicated, vehicle-specific engineered system designed to mount the radiator in a clean, elevated position. Most designs relocate the radiator onto the upper front hood rack, though certain multi-passenger or utility platforms place it on the rear roll cage structure behind the cab.
These kits generally consist of:
- CNC-Laser Cut Mounting Brackets: Heavy-gauge aluminum or powder-coated steel brackets engineered to absorb chassis flex and frame vibration.
- Protective Faceplates: Laser-cut mesh grilles that allow maximum air intake while shielding the radiator face from direct impacts.
- Extended Coolant Lines: High-temperature, multi-ply silicone hoses or reinforced rubber lines designed to bridge the increased distance.
- Wiring Harness Extensions: Plug-and-play or solder-ready water-sealed wiring for the electric cooling fan and temperature sending units.
- Air Bleed and Overflow Hardware: Relocated overflow bottle mounts, brass barbed junctions, and high-grade worm or T-bolt clamps.
To view compatible systems and hardware for top makes like Can-Am, Polaris, and CFMOTO, explore our selection of parts categories tailored for severe-duty riding.
Major Benefits of a UTV Radiator Relocation Kit
Deciding to cut into your factory hood or repath cooling lines is a serious modification. Here is why serious trail riders and mud racers consider it one of the highest-value powertrain upgrades available.
| Feature | Factory Low Mount | Relocated Hood Mount | | :--- | :--- | :--- | | Debris Exposure | High (direct splash/mud intake) | Low (elevated above standard splashline) | | Airflow Quality | Blocked easily by grass, mud, and water | Clean, unobstructed ambient air | | Trailside Cleaning | Requires removing plastics/skid plates | Spray or wipe down in seconds with a water bottle | | Puncture Protection | Minimal plastic guard coverage | Heavy-duty steel or aluminum outer faceplate | | Cooling Consistency | Spikes frequently in deep swamp/bog riding | Maintains stable 185°F–205°F operating window |
1. Unobstructed, Clean Airflow
By pulling the radiator out of the front wheel wake, clean air flows continuously across the core even while idling through axle-deep soup. This setup keeps the cooling fan from working overtime, preventing unnecessary drain on your stator and battery.
2. Rapid Trailside Cleanout
If you take a wave over the hood, cleaning a top-mounted radiator takes less than a minute. You can wash away mud using a water pack or pump bottle without disassembling bumpers, grilles, or inner fender liners.
3. Engine and Drivetrain Longevity
Overheating does not just hurt the radiator. Sustained high coolant temperatures degrade engine oil rapidly, stress the cylinder head gasket, cause premature belt wear in adjacent CVT systems due to shared engine bay heat, and can warp internal aluminum components.
Drawbacks and Installation Caveats to Consider
While the thermal performance gains are undeniable, relocating your cooling package comes with realistic trade-offs that every rider must understand before drilling mounting holes.
- Reduced Forward Visibility: Hood-mounted kits create a visual rise on the front rack. For taller riders, this is negligible; for technical rock crawling where precise front tire placement is critical, it slightly narrows your immediate ground line of sight.
- Permanent Body Modification: Most front hood kits require cutting a section of the OEM plastic hood to route coolant hoses and clear the fan shroud.
- Cab Heat Displacement: Radiating air that used to escape under the chassis now vents upward over the hood or behind the cab. In cold climates this is a bonus, but in hot summer riding, air movement over the windshield can add slight warmth.
- Front Cargo Rack Loss: If your UTV uses a front rack for gear bags, chain saws, or gun boots, a hood relocation kit occupies that footprint.
Step-by-Step Overview: Installing a Radiator Relocate Kit
While installation varies slightly between models—such as a Can-Am Maverick X3, Polaris RZR XP, or CFMOTO CForce/ZForce—the core mechanical steps remain identical. Review this shop-tested workflow before beginning your build.
Step 1: Prep and Fluid Evacuation
Never open a warm cooling system. Allow the machine to cool completely. Place a drain pan beneath the lowest point of the cooling circuit, remove the lower radiator hose or drain bolt, and remove the pressure cap to allow the system to drain cleanly.
Step 2: Disassembly and Core Removal
Remove the front bumper, hood panels, and factory front fascia. Disconnect the cooling fan electrical harness. Carefully loosen hose clamps, separate the hoses from the radiator inlet and outlet, and lift the stock radiator core out of its lower rubber isolators. Inspect the core thoroughly for bent fins or micro-leaks.
Step 3: Bracket and Shroud Assembly
Assemble the relocation bracket according to the kit manufacturer's hardware specifications. Most high-end kits use anti-vibration rubber grommets to mount the radiator inside the external steel shell. Bolt your stock fan assembly to the core using factory torque values.
Step 4: Plastics Trimming and Mounting
Position the bracket template onto your front hood or rack. Double-check clearances with your steering geometry, suspension shock reservoirs, and winch power cables before cutting. Use a rotary tool or pneumatic body saw to cut the access channels for hoses and electrical wiring. Bolt the relocation cage securely to the frame mounts or heavy hood supports.
Step 5: Routing Extended Plumbing and Wiring
Route the extended silicone coolant hoses from the engine block up to the relocated radiator fittings. Use smooth, gradual sweeping bends—never kink the hose, as sharp turns introduce air pockets and restrict water pump flow. Fasten heavy-duty zip ties or cushioned P-clamps to secure lines away from rotating shafts and exhaust head pipes. Extend the fan harness using weatherproof heat-shrink butt connectors or plug-and-play extensions.
Step 6: Bleeding the Cooling System (Crucial Step)
Air pockets are the number one cause of immediate post-installation overheating. Because the radiator cap is now the absolute highest point in the entire vehicle, bleeding is simpler, but trapped air in the cylinder head jackets must be removed.
- Fill the relocated radiator with a 50/50 ethylene glycol or propylene glycol powersports-grade coolant.
- Leave the cap off, jack the front end up slightly, and start the engine.
- Allow the machine to reach operating temperature until the thermostat opens (typically between 180°F and 195°F).
- Squeeze the lower and upper coolant hoses to dislodge trapped bubbles while watching the filler neck.
- Top off the fluid level as air burps out, close the high-pressure cap tightly, and verify the overflow recovery reservoir is set to the cold line.
If you prefer professional installation or want hands-on assistance configuring your build, stop by our physical shop to consult directly with our technicians.
Troubleshooting Common Cooling Issues After Relocation
If your temperature gauge climbs after installing a utv radiator relocation kit, the cause almost always traces to installation oversights rather than the kit itself. Use this diagnostic checklist:
- Air Lock in the Upper Head: Squeeze lines while elevated. If hot air does not blow from the cab heater (if equipped) or the fan cycles on while the radiator face feels cold, the thermostat is air-locked shut.
- Reversed Fan Polarity: High-performance electric fans are directional. If your wiring is reversed, the fan will push air out through the front instead of pulling cool air through the core, severely stalling cooling efficiency at speed.
- Hose Kinking Under Chassis Flex: Ensure lines have enough slack to tolerate chassis twist when traversing off-camber ruts.
- Worn Radiator Cap: A weak radiator cap that cannot maintain 13–18 PSI (model dependent) will cause the coolant to boil at a lower operating temperature.
For high-performance components, replacement silicone hoses, and cooling parts from the industry's top brands, ensure every fitting matches your specific rig's displacement.
Real-World Riding Scenarios: Is It Worth It for You?
Scenario A: The Southern Mud Park Enthusiast
- The Rider: Spends weekends traversing waist-deep gumbo clay and peanut butter mud.
- The Verdict: Essential Upgrade. In this terrain, a stock-location radiator clogs completely within 20 minutes of trail time. A relocated kit pays for itself immediately by preventing trailside towing fees, engine rebuilds, and ruined riding trips.
Scenario B: The Western High-Speed Desert & Dune Runner
- The Rider: Navigates wide-open dunes, high-speed desert washes, and steep sand climbs at speeds over 40 mph.
- The Verdict: Generally Unnecessary. High-speed desert riding provides uninterrupted clean airflow to the stock nose cone. In this environment, a hood-mounted radiator can restrict downward visibility over blind dunes and alter high-speed weight distribution unnecessarily.
Scenario C: The Northern Forest Trail & Rock Crawler
- The Rider: Crawls through rocky, rutted trails with frequent water crossings, downed timber, and dense brush.
- The Verdict: Recommended. While not mud-bogging, low trail speeds mean limited ram-air cooling, making the fan run constantly. Elevating the radiator protects the fins from branch strikes and eliminates leaf-litter blockages.
Conclusion
Investing in a utv radiator relocation kit transforms your side-by-side from a vulnerable trail cruiser into a resilient, go-anywhere machine. By elevating the core away from standing water, thick clay, and trail-brush impacts, you safeguard your motor against catastrophic thermal failure and spend your weekends riding rather than waiting for limp mode to clear. Ensure proper hose routing, take your time bleeding trapped air, and inspect core fin integrity regularly to keep your UTV operating at peak performance.
Frequently Asked Questions
Will a radiator relocation kit void my vehicle warranty?
In most jurisdictions, aftermarket accessories cannot automatically void an entire vehicle warranty unless the dealer or manufacturer proves the modification directly caused the component failure. However, an improperly wired fan, poor coolant bleeding resulting in a warped head, or severe chassis trimming can lead to denied warranty claims on affected engine or cooling parts. Always verify your dealer's specific policies before cutting plastics.
Can I use my stock radiator with a relocation kit?
Yes, the vast majority of aftermarket kits are engineered specifically to reuse your OEM aluminum radiator core and electric fan assembly. This reduces upgrade costs significantly. However, if your original radiator already suffers from bent fins, pinhole corrosion, or internal scaling, replacing it with a heavy-duty, high-capacity aftermarket aluminum radiator during the relocation process is smart preventative maintenance.
Does relocating the radiator make the engine run cooler than normal?
Relocating the radiator does not cause the engine to run below its designed operating temperature because the mechanical thermostat continues to regulate engine block coolant flow. Instead, it prevents thermal spikes and runaway overheating. By ensuring the radiator fins receive clean, unobstructed airflow, your cooling system maintains an optimal 185°F–205°F range regardless of trail muck.
How do I bleed trapped air out of a relocated radiator?
Raise the front wheels of your UTV slightly with ramps or a floor jack to make the radiator filler neck the highest physical point on the machine. Remove the radiator cap, fill the system with approved coolant, and start the engine with the cap off. As the engine warms to operating temperature and the thermostat opens, gently massage the radiator hoses to push trapped air pockets up and out through the neck, topping off the fluid as bubbles surface.